Thankfully, it wasn't very much damage – it only went through the very first prepunched hole on the corner and the skin was only bent by about 8 degrees or so. That said, it was disappointing to already have a damaged part this early on.
If the damaged area had been any larger, or if it would have costed less than $85 plus shipping to replace it, then I probably would have just ordered a new skin. I've heard that "straighten it and build on" is the advice Van's usually gives in these situations, so I decided to avoid the expense and attempt to fix the damage myself.
I went to work with a cloth, a small block of wood, and a mallet. I covered the skin with the cloth to prevent any surface damage and then used the wood block and the mallet to gently tap the skin back into its original shape. The results aren't perfect, but the skin is straight again.
There's still a slight deformation on the corner, but it's very minor and probably won't be an issue structurally. It's bent inward toward where the VS spar will be, so I don't have any concerns about the aft edge of the skin flaring outward. Cosmetically it's a little annoying, but it looks as though most of the damage will be covered by the tail fairing and paint.
It honestly looks a lot worse in these pictures than it does in person. I double checked with the folks over at the Van's Air Force forums and they agreed that it probably isn't worth scrapping the whole skin for this tiny corner. Perhaps the perfectionist in me will replace the skin later on and use this one for sheet metal practice, but I'll keep it for now.
 |
| You can still see where the bend is when the light catches it, but it won't be nearly as noticeable once the tail fairing is in place and everything is painted |
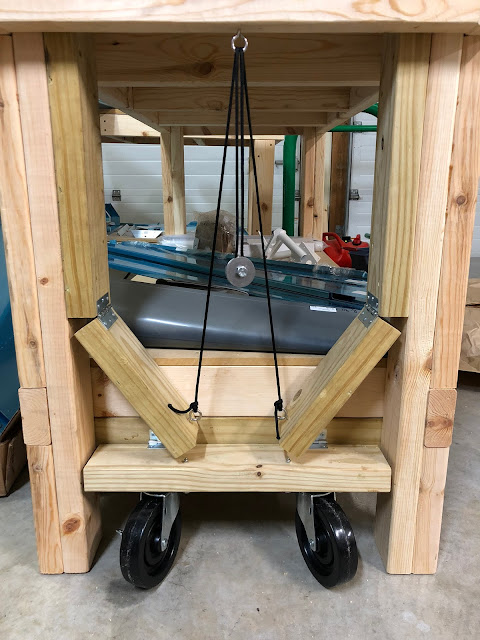
I'm still waiting patiently on my Cleaveland tool kit to arrive (the DRDT-2 and a couple other items are on backorder), so my next project to keep me busy in the meantime was to finish adding "retractable gear" to my workbenches to make moving them around the shop a little easier. I modeled mine after the retractable casters seen in this video from EAA.
I already had four 5-inch casters lying around, so about $10 worth of cabinet hinges, eye screws, and paracord and half an hour of cutting more 2x4s resulted in some nice retractable wheels.
Mine differ from the EAA's in that I decided to have the additional 2x4s run all the way up the legs to the tabletop (for looks more than anything), but they function identically. Lift the bench and kick the boards into place to use the casters, then lift the bench and pull the paracord to remove the boards and allow the casters to retract when finished. This should make moving the benches a lot easier and a lot less noisy on the concrete floor.
 |
| GEAR.....................DOWN |
 |
| GEAR............................UP |
...And at this point there's not much more I can do until my tools arrive. All I can really do is continue to wait and try to keep myself occupied some other way. Probably by browsing the VAF forums and daydreaming about my plane, but what else is new?


